- Home
- Science Activities
- Terrarium
Toddler Science: Creating a Terrarium
Description
Toddler Science: Create a cool terrarium with a plastic soda bottle. A fun Green Project for kids. Plants are usually a big unit in the lower grades and this would make a great culminating activity in the classroom. Since it is creating a small scale ecosystem, many science concepts can be introduced. This soda bottle terrarium traps humidity and heat inside and sustains its own water cycle.

Materials
- One 2-liter bottle of soda (with cap)
- Small stones or pebbles to line one to two inches deep on the bottom.
- Charcoal Granules to keep odors from developing. (optional)
- Sphagnum Moss to keep soil from seeping into the drainage layer.(optional)
- Potting Soil
- Choice of Small Plants (Ivy is a good choice)
- Sharp Scissors (adult only)>
- Plastic spoon
- Newspaper to work on
- Paper plate to remove plant from pot and separate individual plants.
- Decorative objects like small shells, colorful pebbles or small plastic figurines can be added. The girls added frogs to the example below in the glass container.
Steps
- Wash the soda bottle thoroughly with dish soap and rinse well. You may want to wash other items being placed in the terrarium. Dry all items.
- Cut bottom half of soda bottle four-six inches from the bottom. You may need to poke a hole with tip of scissors to start the cut. (Adult only)
- First, put one inch of coarse sand, gravel, or pebbles. This is the drainage layer that captures excess moisture, so that the roots won't get over watered.
 Cut the bottom of the soda bottle
- Add a thin layer of charcoal granules. This keeps odors from developing. You can buy this at a well stocked pet store or at a garden center. (optional)
- Add a layer of Sphagnum Moss. This serves to keep soil from seeping into the drainage layer.(optional)
- Add 3-4 inches of potting soil.
 Add dirt to the terrarium
- Select the plants you want. Remove from pot and gently separate a single plant.
- With plastic spoon dig a small hole where the plant is to be placed.
- Plant your plants carefully. Create a small hole and set or tip your plant in. Make sure all roots are in the hole.
- Fill soil on and around the roots, and tamp down lightly. Add a spoonful of soil if necessary. Give a little space to grow between the plants.
 Add your plants to your terrarium
- After adding your plants, add water to make soil moist but not soggy.
- Slide top of bottle over the bottom. If it is too tight, make a small 1/2 inch slit on each piece and fit together carefully.
- Put the cap back on the top of the soda bottle.
 Add water to your terrarium
Tips and Suggestions
- Gather all the materials needed before beginning this toddler science activity. Cut the soda bottles ahead of time.
- When selecting plants, choose ones that have similar growing conditions. Since you don't want to keep it in direct sunlight, read the growing conditions on the tag at the store.
- Keep your Terrarium out of direct sunlight. Direct sunlight can cause temperatures in the enclosed environment to rise rapidly and your container will get foggy.
- It is best to use a spray bottle to spray water into the container rather than pouring it in. Close the container and check it daily for the first few days. If the soil appears too dry, add a little more water. If it appears too moist and the container becomes foggy, take the top off for a while to allow some evaporation.
- You can find some of the materials at the Dollar Tree or similar stores. Pebbles, containers and even the peat moss. Each store may vary their selection so call ahead.
Educational Tips
- Terrariums are a self contained environment. Once they are established, they need nothing from the outside except a little indirect sunlight. If it is placed in the right amount of sunlight, they thrive without water for several days to a few weeks.
- Moisture in the Terrarium evaporates from the soil and plant leaves. It condenses on the Terrarium walls (sides of the soda bottle) You can point out the water droplets to your child to show how the plants are being watered. The condensed water then falls down and re-moistens the soil. As long as the top is sealed, this process will continue for months.
- Note that on the first couple days, the container may appear cloudy...by the third day water droplets started to form.

Glass Terrarium
 Glass terrarium allows you to see all the layers
Fun plastic figurines make this terrarium extra special!
Scientific Processes
Observation- Seeing the plants.
- Feeling the soil and plants
- Silent Showing how to dig a hole by demonstrating
- Oral Lots of verbal discussion when purchasing plants, learning about the different types and giving directions
- Pictorial Reading a book or researching online plants to grow
- Measuring where to cut, amount of pebbles and dirt
- Quantity Comparison How many seeds or plants planted
Recent Articles
-
Paint a Pet Rock
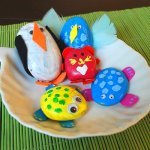 Paint your own Pet Rock
 -
Home Lunch Ideas for Kids
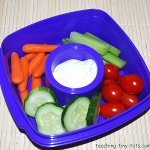 Home lunch and Snack Ideas for Kids
 -
Dirt Cake for Parties
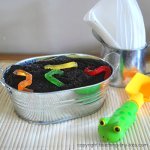 Dirt Cake for Parties
 -
Carnival Games for Kids
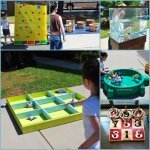 Carnival Games for Kids
![]()
Copyright© 2025 teaching-tiny-tots.com.