Pumpkin Craft with Tissue
Description
Make this Halloween pumpkin using tissue and Elmer's glue. Read a few Halloween books and do this as a culminating project. The children then wrote a sentence or two about their pumpkin and we hung these all around the classroom. Great way to incorporate art in meaningful way. Also helps with fine motor skills.

Materials for this Pumpkin Craft
- Black Construction Paper
- Pencil or Print our free Printable Pumpkin Outline.
- Orange Tissue Paper
- Green Tissue Paper
- Elmer's Glue
- Small dish to hold the Glue and water mixture
- Soft Paint brush like a water color brush
- Acrylic Spray (optional but recommended, makes it have a nice sheen and will last for a long time.)
Helpful Items
- Scissors or paper cutter
- Small tray, plate or container for the tissue squares
- Newspaper to work on
- Art smock or old shirt
Steps to Making a Pumpkin With Tissue

- Draw a pumpkin shape with pencil on the black paper. Show your child the outlines.
- To do this in a classroom, we have also provided a free printable that you can use as Stencil. Print it out and trace on a manila folder or oaktag and cut out to create a stencil. For kindergarteners you will want to prep ahead of time and trace it for them. Older kids can trace it themselves. Have it done in small groups or make a stencil per table and have them pass it around.
- In a small dish put about a tablespoon (3 teaspoons) of Elmer's glue and about two teaspoons of water. Mix thoroughly with brush. For a larger amount keep the 3:2 (Glue:Water) ratio.
- Brush half of the pumpkin with the Elmer's glue mixture.
- Lay tissue squares onto the glue. Use a soft brush to add another light coat of Elmer's glue over the tissue very gently or the tissue will move or tear.
- Add a second of tissue overlapping areas that have black showing through. Again lightly brush the tissue with glue. Add a third layer if you want more color or leave it a little more sheer with just two.
- Brush glue on the other half of the pumpkin. Lay squares again in two or three layers.
- Add a few pieces of green tissue for the stem.
- Brush over entire picture lightly to seal all edges.
- Glue on eyes, nose and mouth cut from black construction paper. There are many printable patterns online or let each child create their own.
- Let dry.
- For a light shine, spray with acrylic spray in well ventilated area. (Adult only) This will help protect the picture and makes it look finished.
Tips and Suggestions
- If your child is a young toddler you can brush on the glue and let your child just lay the tissue on the glue. Or you can guide their hand to let them have the experience.
- Note that the tissues do not have to stay in the line, just having the approximate shape works well and gives each pumpkin some character. The eyes and mouth will make it very apparent it is meant to be a pumpkin.
Other Ideas
Make other Halloween subjects like a ghost with white tissue or a black cat on orange construction paper, a bat on white.Educational Tip
- Read a Halloween story about a pumpkin. Some of my favorites that I read in the lower elementary were:
- Have your child give their pumpkin a name or have your child tell you a simple sentence about the pumpkin and write it for him or her on another sheet of paper. Attach to the bottom or the back or their project to take home.
Recent Articles
-
Paint a Pet Rock
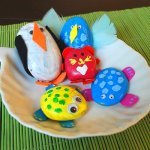 Paint your own Pet Rock
 -
Home Lunch Ideas for Kids
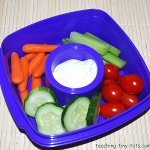 Home lunch and Snack Ideas for Kids
 -
Dirt Cake for Parties
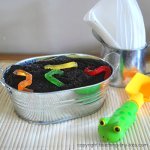 Dirt Cake for Parties
 -
Carnival Games for Kids
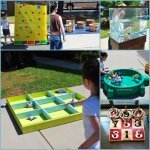 Carnival Games for Kids
![]()
Copyright© 2025 teaching-tiny-tots.com.