Felt Bookmark
Description
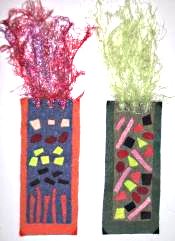
Make a felt bookmark your child using just felt, yarn and your child's creativity. Older toddlers familiar with gluing smaller pieces will do best at this craft.
Materials
- 5-10 different colors of felt
- Elmer's Glue
- Yarn
- Hole Punch
- Waxed paper
Steps
- Cut one piece of felt 2 1/2 inches x 6 inches
- Cut second piece of felt 17/8 inches x 5 3/8 inches
- Use hole punch to cut three holes across the top of the smaller piece of felt.
- Glue the two rectangles together as shown in photo. Do not punch the other holes at this time. Be very generous with the glue.
This will give the bookmark some stiffness.
- Put bookmark between waxed paper and place it under a heavy book. Leave for several hours.
- Cut out pieces of felt to decorate the bookmark, the pieces should be large enough for your toddler to hold and put in place. Have at least five
different colors and a different shape for each color.
- Cut yarn 8 inches long and prepare 2-3 strands for each hole. The number of strands depends on the thickness of the yarn.
- When the rectangles are completely dry you may start decorating the bookmark.
Tips and Suggestions
- Sort the felt pieces by color or shape before gluing on the pieces.
Make a pattern using the felt pieces prior to adhering to felt.
- Place a drop of glue on the felt that your toddler is holding and let them decide where to place it. It's alright if you see glue coming out from under the felt, it will dry clear.
- Be generous with the glue, do NOT press hard on the piece of felt. Sitting on "a cushion" of glue will create the best bond.
- Use a glitter paint to add shine or spray with Acrylic Spray
- Allow to dry for several hours.
