- Home
- Activities
- Picture Puzzle
Picture Puzzles and a Scavenger Hunt
Description
Make your own puzzles from drawings or photos. Print our free puzzle patterns or make your own. We have made different sizes for different ages. This was an idea my girls came up with for our anniversary and I thought it was such a fun unique idea that our readers would love to try it out. See our video for a full explanation or print out our directions. You can choose favorite pictures or have your child draw a picture of their own. This would make a great make and take for a play date or party. The scavenger hunt was an added step the girls did for our anniversary. It was a lot of fun so we will be sharing that as well.
Printable Patterns
There are many free printable patterns online but we chose three that we likes for it's simplicity and different sizes. Free Printable PUZZLE PATTERNS.Materials
- Photo, hand drawn picture, greeting card or magazine photo
- If you are drawing your picture you'll need crayons, paint, colored pencils, markers and pencils.
- Print out puzzle pattern
- Cardstock to print or glue to back of picture
- Scissors
- Elmer's Glue for light papers like computer paper., Fabri-Tac for thicker papers like card stock, photo paper or scrapbook paper.
- Mod Podge or Acrylic spray
- Brushes for paint and Mod Podge.
PHOTO PUZZLE
- Print a photo on glossy photo paper and cut off any excess. Leaving a small white border around the photo makes it easier to assemble but is optional. See our photo puzzle above.
MINI PUZZLE
- Here is a great option for younger kids or for birthday make a takes.We used square colored cardstock and painted on the designs. Using a sturdier paper is highly recommended like water color paper or cardstock.

PUZZLE MADE FROM DRAWINGS
- You can draw a picture using any media from markers, crayons, pencil and pen. You can use computer paper, construction paper or cardstock for a thicker puzzle piece.

Steps
- After designing your puzzle, add a backing. We used a sturdier paper for the bigger puzzles. This is paper for scrapbook making that has different colors and patterns and is as thick as card stock.
- If you want to use one of our puzzle templates, print it out and then print that pattern on your backing paper before you glue it to the back of your puzzle. We have a few of our favorite free printable PUZZLE PATTERNS. here.
- Apply glue all over the back of your puzzle design because you will be cutting out the pieces and you don't want them to fall apart. A brush gives an even application of the glue and we liked using Fabri-tac for a nice strong seal.
- Once the backing is on, brush Mod Podge on your design or picture. This will help make your pieces stronger and less resistant to water damage and handling. It will also give your pieces a nice sheen. Let dry completely or else you may smear your pictures. Be sure to cover in thin light coats so you don't have white spots.
- Now it's time to create a puzzle out of your design. If you used a pre-made templates, simply cut out the pieces according to the pattern you printed on the backing.
- If you are making your own pieces, draw them on the back. Draw a mushroom like shape on each edge to create a puzzle case. You can use a simpler shape if desired. The blue puzzle is about 25 pieces , each square is about 1.5 inches in height and width. Don't make the pieces too small or it will be challenging to cut as well as assemble.
- Then cut out your puzzle pieces. Don't trim or perfect the edges as you will end up with gaps between the pieces. This step is better suited for older kids or adults. If your child wants to cut the pieces out, a 4-9 piece puzzle is more appropriate.
- You can also create a triangle puzzle if desires. Draw lines to create various sized triangles. (see our cloud puzzle example) This is much easier to cut but it can also be more difficult to solve.
Scavenger Hunt Idea
Description
A great way to make a puzzle more exciting is by creating a scavenger hunt using each piece! The scavenger hunt is like a series of multiple choice questions with answers. A themed scavenger hunt would have questions relating to such as birthdays, holidays, or a special event.- Each clue will ask a simple question with a specific answer. For example: "What is your favorite color?" The answer will tell the location of the next puzzle piece and clue.
- To set this up, create a list of hiding places for each puzzle piece.
- Make a list of easy to answer questions.
- Make an envelope for each puzzle piece with the next clue. Simple fold a small piece of paper to hide the puzzle piece.
- The first question will have no puzzle piece, just the clue where to find the first puzzle piece. The last puzzle piece will have no question but you could indicate that it's the last pieces with a Congratulations you have found all the pieces message.
- Note that select easy to reach hiding places that are not in areas you don't want children to access. Choose easy to see locations like a door knob or on their pillow or closet door.
This document was created to help plan a scavenger hunt...a fill in the blank for questions and answers. It is a much shorter document for quick planning. Scavenger Hunt Planner Pages
Recent Articles
-
Paint a Pet Rock
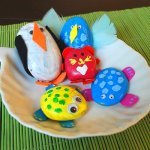 Paint your own Pet Rock
 -
Home Lunch Ideas for Kids
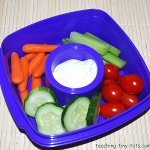 Home lunch and Snack Ideas for Kids
 -
Dirt Cake for Parties
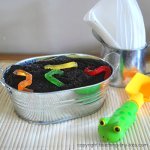 Dirt Cake for Parties
 -
Carnival Games for Kids
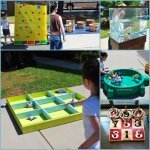 Carnival Games for Kids
![]()
Copyright© 2025 teaching-tiny-tots.com.