- Home
- Activities
- Salt Dough
Using Molds to Decorate Salt Dough Ornaments
Description
Use a mold and cookie cutters to make salt dough ornaments. This can be done for any holiday or occasion.

Materials
- 1 cup salt
- 2 cups all purpose flour
- 1 teaspoon Alum (optional)
- 3/4 cup cold tap water water
- Crayons
Materials
- Crayons
- Cookie Cutters
- Copper Mold
- Medium Bowl
- Rolling Pin
- Straw to make hole in ornament
- Floured surface to work on
- Generously floured cookie sheet to bake cookies on
- Ribbon to attach to ornament so it can be hung or tied to gift
- Gloves to keep food coloring off of hands
Steps
- In a medium bowl, place all dry ingredients and mix to blend dry ingredients thoroughly..
- Add food coloring to half the amount of water (start with 8-10 drops) If the color is what you want, add the rest of the water and mix. If you want the color darker, add more food colouring to the remaining water and mix.
- Add water to the dry mixture and mix with hands. Use gloves if you don't want the color on your hands.
- If the dough is sticky add more flour and if it is too dry add a little more water. The dough should be nice and smooth and will not separate when it is kneaded properly.
- Roll out a quarter of the dough on a floured surface. Roll the dough as close to 1/4 inch as possible.
- Press the dough into a floured copper mold.
- Cut with a cookie cutter and while the cookie cutter is in place, use a straw to punch a hole in the cookie so you can later attach a ribbon.
- Prepare cookie sheet with a generous layer of flour
- Place the cookies on the floured baking sheet and bake in warm oven below 200 degrees, most ovens have a warm setting for 2 to 3 hours. (Parent step only!)
- Remove from oven, turn over and return to oven. Repeat at least 3 times.
- Turn off oven and let cookies remain inside until cool.
- After the cookies are dry, brush off excess flour decorate with crayons and tie with ribbon.
Important Note
This baking process allows the cookies to dry slowly, if the oven is too hot they will start to brown and salt dough should be as white as possible for the prettiest results.Tips and Suggestions
- This toddler activity is best done in two days. The first day make the dough, cut it out and bake. On the second day decorate and display.
- Don't make the dough in advance or use leftover dough.
- Alum is optional. Alum is an astringent that aids in binding the ingredients.
- Cookies larger that 2 1/4 inches may not dry flat. If you are experiencing this, allow the cookies to dry at room temperature for 24 hours on a floured cookie sheet, then continue to dry out in warm oven. Most average size cookies are dry in 24 hours.
Recent Articles
-
Paint a Pet Rock
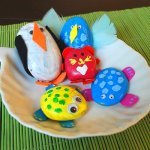 Paint your own Pet Rock
 -
Home Lunch Ideas for Kids
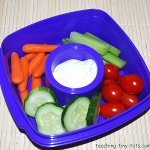 Home lunch and Snack Ideas for Kids
 -
Dirt Cake for Parties
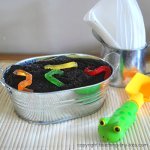 Dirt Cake for Parties
 -
Carnival Games for Kids
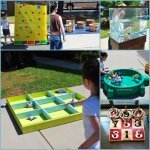 Carnival Games for Kids
![]()
Copyright© 2025 teaching-tiny-tots.com.